Thursday, November 12, 2009

Elizabethan Loose Gown: The sewing (part 2)

Having the pieces cut out, I finally began the 'fun' bit and started the sewing. The body of the gown went together pretty quickly since the lining and outer shell each only had 3 seams. When trying them on together (before being sewn together) I was really pleased with the 'weight' of them. And the flannel is lovely and soft!


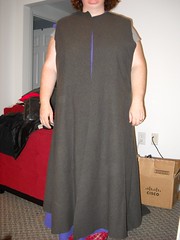
The hem is hanging all wonky in the picture, but this is roughly how the dress would look if I did it the period style and didn't put sleeves on it. That said...I want SLEEVES!!! And, it was my desire for sleeves that presented my first problem -- how to put them in the dress. Option 1: Sew the outer sleeves to the outer shell, and the inner to the inner, then invert the lot and hand sew the cuffs of the sleeves. Option 2: Put the outer and inner sleeves together and THEN attach them to the coat.

Option 1 seemed the best option as it would allow for a more 'finished' look. However, I was leaning toward option 2 because I want to eventually take the sleeves apart and make them button from the shoulder to the wrist so I can poke my arms out if I get too hot.

So, I compromised. I put the inner and outer sleeves together and finished the cuffs, before attaching them to the outer shell only. The sleeve caps are quite big, so they had fat pleats along the top which were a pain in the rear to pin and place -- but turned out terrific!

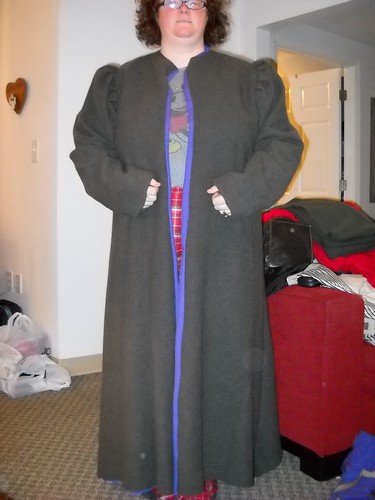
The picture on the left shows how long the sleeves are - sort of. When my arm is hanging down, if I don't hold them up, they hang WAY over my hands. Not necessarily a BAD thing at a cold event, but not convenient either. The picture of the right shows the cuffs rolled up - which is how I think I will wear them as it keeps them on my wrists and provides an added 'wind gap' measure -- that is, less wind can whip up the cuff!.

I have two options here. Option 1: wear the coat with the rolled purple cuffs, and for added flair, sew the front edge as it is shown here, with the hint of purple lining showing. Option 2: Be conservative when I sew my velvet hood and try to have enough velvet left over for both the collar AND faux cuff lining so that I have a black velvet turn back to match the black velvet outer collar (which has yet to be put on).

Hmm...decisions decisions. I'm leaning toward the velvet idea, since my colors are red, black and gold, I'd really like to have my coat be those colors. That said, for the moment I will probably just line the collar in flannel and save the velvet for the hood, because after the event I would like to soak the coat in a black dye bath and see if I can't get it darker (and I don't care if the purple changes color).

Next steps -- adding the collar, hemming it and adding the fasteners down the front! :) Whohoo!! Should have a wearable coat by Friday night!

Elizabethan loose gown (part 1): Sorting out the Pieces

In preparation for the Castle Wars, November 20th tenting event in Macon, it came to my attention that I had NO cold weather gear. Well duh!! Being in Australia from 10 years, I never needed anything warm. Alas, now I do....so after years of drooling over Mistress Constanzia's wool coat, I have decided to make one of my own.

Saturday, October 17, 2009

Spanish split pane cap sleeves ...or more sewing math


Well, today was the Owl's Nest open house/work day. Ken and I toddled off around 11-ish with a whole car boot FULL of our various odds and sods: sewing machine, knitting, SCA craft box, embroidery, Ken's fencing gear, etc.... the works. With the fire roaring in the back yard grate and several tables set up on the back porch, I set about with a piece of newsprint and my sewing notebook to design a pattern for the Spanish split pane, cap sleeves that I have wanted to add to my dresses for a long time (see the picture to the right, the top half of the sleeve). But pattern drafting is never easy for me.

One word -- MATH.

Numbers and I just do NOT get along. The difficulty is that I can start to visualize how things SHOULD go, but I struggle with getting the figures right.

Friday, October 9, 2009

And that is why....I am not a mathematician!

So, I am working on the farthingale using the Algeca pattern (check my previous post for a picture of the pattern). Now anyone who knows me knows that I went into journalism because I like words - NOT numbers. So, it should come as no surprise that working out the math for the farthingale pattern was a time consuming process. In fact, it took me nearly 4 hours of crunching the numbers before I was pretty sure I got it right.

Guess again, Einstein!

I used the Algeca pattern shapes and worked out how wide the bottom of each cut piece needed to be so that the finished hem would be somewhere in the order of 110 inches. Seemed simple enough - WRONG!

Wednesday, October 7, 2009

Spanish Farthingale....part one

My SCA goal for the year was to create a completely period outfit from the skin out. Since I pfaffed the summer away, I won't meet the goal, but I am still making progress toward it. I finished the first part in the spring when I converted a plain, gathered neck chemise into a striped, round neck chemise. This past week I have finished the corset (minus the shoulder straps) and now on to part 3 - the farthingale.

Monday, October 5, 2009

SUCCESS! The Corded Corset is DONE!

Well, thanks to a relaxing day off work I was able to finish my corset. I'm really pleased with how it turned out since it is my first attempt. I even added lacing holes to the sides so that I will be able to tie the farthingale onto the corset. Sometime in the next week I'll get around to adding tie-on shoulder straps to it.

As you can see from the back pictures (click 'read more' to see the pics), it laces completely shut - which wasn't expected. I'm thinking that I will eventually cut it up the front so that it laces from both the front and back. That would be useful as I'll be able to lace myself into the corset rather than needing Ken to do it each time I get dressed.

Next up on the agenda - Spanish hood/veil out of velvet and silk satin and marking out the embroidery for the muff.

Sunday, October 4, 2009

Corset Pictures...

I've been promising pictures of the corset, so here you go.

Yet more projects and plans...deadline Nov. 20 :)

I had a perfectly lovely day running errands with Ken yesterday. We ran all over hill and dale (namely Atlanta and the regions around it). Our goals were to hit the army/navy surplus stores hoping to get lucky and score some cheap camping equipment for the November SCA event we want to go to. While we didn't score cheap camping equipment, we DID pick up some nifty things for some sewing projects for that event.

Friday, October 2, 2009

Corset update....

Well, the corset is coming along. When trimming the plastic cable ties, the tin nips and gently melting the cut ends worked very well. After trimming all of the ties and the jute cord, the corset was pronounced by others as 'really neat'.

Now I'm on the odious task of putting lacing holes in the back. Since I am trying to maintain SOME form of authenticity, no metal grommets are being used, which means simply, that I am doing all of the lacing holes by hand. Yup, I use an awl, split the fibers apart and then with doubled red thread I hand stitch around each hole. It takes about 10-15 minutes per hole and I have 22 holes total to finish.

I don't really mind doing this. I actually like doing this type of hand sewing. The worst part is that I tend to kink my neck in an odd fashion while doing these things, and because of the tension I have to keep on the thread, after awhile it cuts my hands. So, if all goes well, I should have the lacing holes finished and the binding on the corset by the end of the weekend. Heres hoping anyway.... (pictures soon).

Monday, September 28, 2009

The latest FrankenKirtle (tm) drama....

Okay, so I decided to use 'some' cable ties (around 10) spread out over the body of the corset for support. This seemed like a great idea UNTIL, I remembered that I have to trim the buggers and get them pushed about an inch deep into the channel so the ends are lower than the binding. Unfortunately, this task is not easy. When I cut the ends off the cable ties I get very sharp corners. I tried filing them with wood files - no good. The new solution (which has yet to be tried out - maybe at Fighter Practice/A&S tomorrow night) is to cut the ties with a pair of metal nippers, then use a lighter to melt the ends a bit, then use some small needle nose pliers to shove the ties deep into the boning channels.

What is the bet that I end up with melted plastic on my skin at some point??

Sunday, September 27, 2009

Conundrum of a burgeoning 'authenticy maven' - to cable tie or NOT to cable tie...

So, here's the deal.

Given my *ahem* Mae West-ish upper body, when making my current project (a corded corset) I decided to use some heavy duty cable ties periodically for added support -- because cord on its own would just not be stiff enough to hold things up or tight against the body.

However, since I really wanted to create as authentic an outfit as possible, the burgeoning authenticity maven in me is having problems with the use of the plastic cable ties. On the one hand, aside from the fact that I have now announced the use of cable ties to the world (okay, my 5 or so readers) no one would ever know about it. I mean, it isn't like anyone but Ken is going to get close enough to my corseted body to see that the cable ties are there.

On the other hand, I feel a bit 'wrong' about using the ties.

Hence the question...what to do...what to do?

Wednesday, September 23, 2009

FrankenKirtle fights back....

I am right-handed and at the moment my right hand is blisters, sore and trembling...due to FrankenKirtle fighting back!

I have spent the last hour wrestling boning materials into the corset section and my hand is SORE! The cord boning is an easy thing. I cut off a section of jute that is 4x the length of the channel, double it twice and thread it through the channel using a bit of floral wire. The jute goes through the channels like a hot knife through butter. However the cable ties are a another matter entirely.

Tuesday, September 22, 2009

IT LIVES!!!! FrankenKirtle (tm) rises from the dust...

Well, I stayed home sick today, so between bouts of marking student assignments, I have been working on the FrankenKirtle (tm) -- mark 10 papers, work for a couple of hours, and so on.

What I've done...

On Sunday I used the Drea Leed's 'Corset Pattern Generator' to come up with the basic pattern. Now, I used this generator when I first attempted a corded corset, it ended up being far too small, so this time I over estimated the length by 3 inches and that seemed to help. I think when it is finished that I will have an inch or 2 gap at the back, but I can live with that.

Additionally, this pattern doesn't have straps, which is something I will be adding to it once the boning and binding has been completed.

To recap, the inner layer is white linen, middle layer is heavy canvas and the outer layer is white duck/drill. (see picture at right). Once the layers were cut out, I marked the center of the bust and drew a line, then sewed that line first. This line is then what I use the whole rest of the time to position the needle for all other lines.

To test how wide the channels needed to be I arbitrarily made the first channel 1cm wide, then tested it with my jute cord and some heavy-duty cable ties that I picked up as alternate boning if needed. When playing with the jute, 2 twisted strands didn't quite fill the channels, so I've decided to use 4. Also, to provide support near the laces I am going to give in and use two of the cable ties along each lacing edge. I feel this will provide the added support needed to keep the fabric from buckling when the corset is laced up.

Rather than marking each line, I just moved my needle as far right as it will go, and lined the left edge of the presser foot up with the test line that I sewed first. Every now and then I'd find that I had wavered a little bit, so I would drag out my quilting ruler, and run a new 'straight' line. As a side note, for those who read my experience in creating the striped chemise -- sewing corset channels is also VERY good practice in sewing a straight line! Thanks to all of the practice I am definitely getting better! :)

I sewed straight channels until I reached the side of each bust (I tested this by holding it up in front of a mirror). On each side of the bust I have a series of straight and angled channels. Since the angled channels don't have a bottom opening, I will use cable ties in these (see picture at right).

At this stage all of the boning channels are finished, so the next task is inserting the cord into the channels. More pictures will be posted as things progress. Getting to this point has taken me about 5 hours (1 to cut out, and 4 to sew channels). The channels are VERY time consuming and a slow slog. I hope to have the cord in the channels by Thursday and have the whole corset part finished by Saturday so that I can start work on the farthingale.

Sunday, September 20, 2009

The birth of Franken-kirtle....

Well, after being a good girl and marking 20 assignments before starting my sewing, I was finally able to start working on the Franken-kirtle. YAY! I have to say, marking those 20 papers was a loooong 5 hours! And I have 50 more to finish by Thursday morning! *groan*

Anyway, this evening I got the layers cut out -- inner out of linen (softer against the skin), heavy canvas for the middle layer and duck/twill for the outer layer. (I'll post pictures tomorrow.)

Now, before someone argues that a corset wouldn't be worn against the skin, let me explain my logic.

Why I will NEVER make SCA garb out of ANY synthetic material....

Okay...I admit it. I started my SCA life with a poly-cotton dress made from a Simplicity 'Maid Marion' pattern that ended up looking like a cheesy 1970's prom dress, complete with an off the shoulder flounce. To cap off this synthetic, out of period nightmare, my first cloak was polyester velvet and I didn't have enough to match the nap, so it ended up looking two-toned.

As I matured in my SCA lifestyle, I remember hearing the oft repeated phrase "NEVER use polyester or synthetic fibers to make garb".

Tales from the darkside - that is a trip to JoAnn's Fabric

Okay, the morning started quiet enough.. a quick Cracker Barrel brekkie, followed by a run to the grocery, mark 20-30 student assignments and then an afternoon of sewing. The problem is that Ken and I do some of our best thinking as a couple, while breakfasting at Cracker Barrel (must be something in the pancakes?).

Anyway, over brekkie we were debating/hashing out how best to incorporate elements of Ken's SCA arms into the black linen fencing hood that is his current pet project. He wanted to do some appliqued dove tailing onto the hem of it, I was of the mind that doing so would be far more difficult than he thinks (an opinion I still hold). Then we talked about using fabric paint, but were worried that would make the hem of the hood stiff and make it lay funny. Then I suggested that he use stem stitch and fill stitch to embroider his foxes (one major heraldic charge) onto each of the 4 gores in the base of the hood. At last...an idea worth following. One problem -- we can't find our embroidery hoops.

So, it was off to JoAnn Fabrics.

Saturday, September 19, 2009

Back from a crafty hiatus with new ideas and inspiration!

Well, my crafty drought seems to have been broken thanks in part of preparing a dress analysis A&S class for our local SCA group. Now I am all inspired again and getting back to sewing.

First up - a corded corset for wearing under garb. The original plan was to make a separate corset and farthingale (medieval hoops skirt, but the more I think about it the more I think I'm going to actually attach the two parts into a kind of 'Franken-kirtle'. *lol* (Kirtle for those who don't know is kind of a medieval underdress that was tight and 'molded' the body).

So tonight begins the making of....

THE FRANKEN-KIRTLE!

(film at eleven....okay...well...pictures at least later :)

Tuesday, June 16, 2009

Stocking Version 1 - DONE!!

Well, tonight at A&S/Fighter Practice for the SCA I finally finished my first ever knitted stocking. The downside is that the way I finished the top line of stitches was done too tight so now I can't put the stocking on my leg anymore! Oh well, I always said this one would be a fighting favor for Ken. So I'm going to put some heart motif embroidery along the ankles (called 'clocks' on Elizabethan era stockings) and let Ken use it as a favor.

Later this week I'll begin working on my 'sample feet' to trial some different heel and toe methods. For the 'sample feet' I will only work up to the ankle, as the whole point of them is to trial different techniques in order to figure out what works best, what may be most period, etc... Then I will work on three other pairs of stockings for me.


  • First pair: plain knee length stockings out of silk/bamboo (I'm allergic to wool). I will use a similar pattern to the 'mach 1' stocking, with the addition of a 'decorative' line of perl stitching down the middle of the back of the stocking -- kind of like Elizabethan seamed stockings -- without the seam. With this pair I will be generating a basic pattern (which I will then post here). I also plan to keep an accurate record of how long it takes me to knit each stocking.
  • Second pair: red acryllic (because I have it on hand) stockings following a recreators pattern based upon the Elinore di Toledo red silk knitted stockings. This pair will have some lacy 'flower' motifs knitted into them.

  • Final pair: (and likely the most time consuming) a pair of red (or white -- I haven't decided yet) silk knee length stockings in a floral motif knitted pattern, based upon the di Toledo stockings, but designed by me. This pair will use handspun red or white silk which is why it will take the longest. I will probably do most of the spinning by spinning wheel, although I really like spinning silk with a drop spindle. Heck, if I get really ambitious, I may spin white silk and dye it myself too!

Tuesday, June 9, 2009

Stocking Experiment - Version 1.0 Update - NEARLY DONE! (Woot!)

Well, this is just a quick update to show the current progress on my first stocking version. I am currently about 5 inches under the bend of the knee. Originally I had planned to make the stocking stop just over the top of the knee, but I think that might be awkward because I have 'full' calves. The problem is, if I narrow the stocking enough for it to fit the knee properly, it will be too narrow to get my chunky calf through. So, rather than going over the knee, I'm stopping just at the bottom of the knee and adding a 2-4 inch fold down cuff.

At this rate I will have version 1 of the stocking completed by the weekend, just in time to display at the Owl's Nest demo on Saturday. The next stocking will be made of red acryllic (because I have it hanging around and I am allergic to wool) and I will be meticulously recording the pattern for that stocking. Additionally, I will be trying a toe method based on the extant Egyptian style stockings. I haven't decided what style of heel to try for the second version, perhaps the Gunnister stocking heel type? Decisions, decisions.... :)

Saturday, June 6, 2009

Knitted Stocking Version 1 -- progress report

Well, it is now week 3 of my 'Knitted Stockings Experiment'. What started as simply a quiet way to kill several hours has expanded to become a long term A&S project on different kinds of knitted stockings. Why? (You may well ask)...Simply because there is a lack of research available for SCAdians regarding socks, and they are such a simple, yet potentially integral part of a proper period wardrobe. So...I'm going to play with socks.


With regard to this "lil project", I am in phase 1, that is creating a basic pattern for a simple knitted stocking. This phase is more for me than anyone else really, since I had never knitted a sock before. It is proving to be really interesting and giving me lots of things to think about in revising the pattern for version 2.


The ultimate goal is to create several different versions of stockings with different types of heels and construction, based upon period methods for knitting and creating sewn hosen/stockings.


Progress Report

My knitted stocking 'Mach 1' is coming along nicely, helped along in part by a particularly nasty sinus infection turned pneumonia, which has had me laid low for the last week and a half. Feeling poorly and out of sorts, I spent quite a bit of time lazing about, watching silly television and knitting (in between naps and bouts of coughing that is).

I turned the heel while waiting for a doctors appointment this past Wednesday. It went much easier than I expected. I followed a heel pattern I found on the internet since I had not worked a heel before. Funnily enough, I expected the heel turning to be time consuming and fiddly, but it really was quite easy and finished within half an hour!


That said, the 'flat knitting' aspect of this particular heel method bothers me a bit from a period perspective since the use of 'perl' stitches is largely held to have been purely decorative; and in the flat stitching method it becomes a structural thing rather than a decorative one. This of course raises the question of how heels would have been created in period. I am mentally playing around with how they can be created by knitting in the round rather than partitioning out the parts and knitting in the flat.

Currently I am heading up the leg, approximately mid-calf. I've been pleasantly surprised with how quickly things are going, particularly since I am not the fastest knitter around (although perhaps I am improving a bit?). I plan to work on my stocking during the SCA demo in Marietta next weekend and with a bit of luck should have version 1 of my stocking project done by the end of the demo.
Knitting stocking project not withstanding, I will be working on two appliqued heraldic pillows later this week -- lumbar cushions for Ken and I to take to the demo next weekend. I will post pictures when they are finished.


Wednesday, June 3, 2009

A deviation from the 'plan'...but success nonetheless

Well, as my (few) readers know, I have a 'want to make' list a mile long. So, one would think that I would have started in on that, right? Hmm, not quite.
While my college roomie was in town the other weekend I volunteered to babysit her nearly 2 year old so she and her hubby could go see the Braves play. Since I am something of a novice with toddlers, when he fell asleep soon after mum and dad left, I did whatever I could to stay quiet for the afternoon so that he could keep on sleeping (let sleeping babies lie and all that!).

Keeping quiet presented a problem for me because I had planned to do some sewing, but with a baby in the house, breaking out needles, scissors and such didn't seem like a wise thing to do. So, as I sat there with 'Cinderella' playing softly in the background, I spied my long neglected craft basket with several skiens of yarn.

Initially I started winding a burgundy skein with the idea of making a pair of scoggers (Elizabethan 'arm warmer' sort of things). When doing that it occurred to me that I couldn't document scoggers in relation to my persona. Since my goal for the year is to create a completely period outfit for my persona, I didn't see the point in starting something that was not appropriate. To that end, I switched and picked up the cream colored yarn, deciding to try making a pair of knitted stockings.
A few notes:
  • These are not 'Elizabethan' style stockings. I have not done much research on period socks/stockings/hose at this point, but I do know that Elizabethan style stockings had 'clocks' on the ankles. Since my period is more around 1480, I elected to go for a simple, more 'rustic' simple stocking.
  • I do not claim that my methods at this stage are period. Again, since I haven't done much research at this stage, I can't say how period my pattern is, this is compounded by the fact that I am cobbling the pattern together as I go along.
  • This is my first attempt at knitting a stocking or any other kind of 'sock' so it is definitely a learning process.

The way I'm approaching things is this....

From what research I have done for previous knitted projects (see knitted hats of the 15th C.) knitting patterns in period were not written down. Rather, it seems knitters learned the basics (increases, decreases for fitting, etc...) and knitted projects accordingly. Therefore, making the pattern up as I go along and fitting the sock to my foot or leg as needed, is an acceptably period way of going about it. Since my first attempt is likely not going to be 'perfectly' fitted, the second stocking will fit differently. I believe this too is period as it is not likely that two socks from the same pair will be exactly identical, a dropped stitch here, forgotten decrease there, and bang....you have a 'different' stocking.

At best, I figure I'll end up with a wearable pair of stockings even if they are a bit different in fit (since I plan to use what I learn on stocking 1, when making stocking 2). Failing that, if I really dislike having essentially 2 different stockings, I can always make a 3rd using the pattern from stocking 2, then relegate version 1.0 to being a fighting favor for Ken (kinda racy...but hey, at least it will have a use!).

What I've done so far

Since I really hate starting knitting in the round and wanted to work on the foot part first, I used a technique in which I started at the toes. By casting on to two needles using a figure eight cast on, I was able to use only 3 needles to knit the toes of my sock. This was definitely experimental for me as I didn't have a pattern for it, I was just playing around. Upon doing other research, it turns out that this technique is becoming quite popular amongst sock knitters. The bonus for this is that there is no seam at the toes.

After knitting up for several hours while the toddler was snoozing on the couch, I had gotten about 3 inches done, tried it on my foot and found that it was far too roomy. So I pulled it apart and started again the next day while Ken practiced fencing.

The toe looks vaguely 'duck billed' in this version (see picture at right). This is because I was doing the increases on both sides which was adding 2 too many stitches in each round. In the next version I plan to do my increases on one side only so that I end up with a stocking that will be right or left footed (depending on the side I put the increases on). I also think the duck-bill effect arose because of way my foot is shaped, I have a jutting bone near my big toe, but then my foot narrows significantly through the ball/arch/sole area.

At the moment I have knitted the heel flap and turned the heel (see picture at right: bottom of heel). This was a new experience for me, but so far it seems to be working as it should. My only concern is that the heel looks a bit narrow. I think for version 1.2 I will start with more stitches on the heel needle (maybe 14 instead of 10) and only decrease to 6 stitches (instead of 4). For the moment, I'm hoping that the heel area will stretch to fit my heel. If not, then a 'favor' this will be. :)

I am planning to knit up to the knee, just below it actually. Then I will make some tablet woven garters to hold the stockings up.

Due to the very nature of knitted stockings, there are very few extant examples, so there is alot that we don't know about them, leaving us really only able to make educated guesses.If you know of some good sources on period socks/stockings/hose, please feel free to post them to the comments section!

Wednesday, May 20, 2009

My Project List

Well...while I am pleased with getting my chemise remade and getting a set of bases (French, late 15th C. upper garb) made for Ken, the list of things that need to be made (or that I *want* to make) is staggering -- JUST FOR ME!

So, here is my list (I'll mark them off as I finish them)....
  • new body block (bodice pattern for those not familiar with sewing terms)
  • a body block for hose (yup -- I'm going to attempt to make proper linen stockings)
  • a simple farthingale (I already have the materials for this, just need to get it going)
  • a simple corset (again, already have the materials, just need to take measurements and start working on it)
  • add stripes to my other chemise and raise the neckline by 4 inches (an ant fell out of a tree and down my cleavage at the last event...rather uncomfortable place for bites and doesn't look particularly lady-like which fishing the angry ant out either!)
  • black linen dress with red trim and short cap sleeves
  • red linen petticoat with black guards around the bottom (one large black stripe, bordered on each side with a thin black stripe, with gold calatrava crosses appliqued on the large black stripe)
  • black and white embroidered partlet (high collared -- to help with the 'ant' problem :)
  • black bag cap and a stuffed pony tail
  • add red or black trim to purple dress
  • raise hem of olive dress and add a black guard around the bottom, as well as lowering and squaring the neck line (to wear with a black linen petticoat
  • blue with red trim spanish 'waist' dress (looks like a bodice with a short peplum skirt attached, worn over a matching full length skirt)
  • Elizabethan loose overcoat style dress (kind of an Elizabethan 'housecoat' worn over other dresses for an added layer of warmth in winter)
  • 2 new chemises (1 with red stripes and 1 square necked chemise with blackwork and beading around neckline)

Whew! That is my clothing list. Lucky for me Ken can do his own sewing! On top of the clothing, I want to add a 'few' (hah!) heraldic items to our camping/event gear including:

  • chair covers (Ken is making stamps of our primary charges and we plan to stamp the covers to mark them)
  • paint our heraldry on our feastgear (plates and bowls)
  • make a painted square banner for me
  • finish Ken's painted square banner
  • silverware pouches
  • leather cup sleeves (lots of SCAdian's have the same style of drinking mugs, so we need a way to distinguish ours)
  • heraldic napkins
  • box for carrying feastgear
  • and last but very necessary.... pilgrims bags (for toting stuff around events and a place to hang all of the event tokens we are collecting)

So there you have it....the to-do list that keeps growing!

Striped Chemise - DONE


Well, the chemise has been done for two weeks now, but I am just now getting back to the blog.

After marking the the lines with the washable marker, I used the very thin (1/4 inch wide) black satin ribbon and stitched along the marked lines with a zigzag stitch. Getting the right size zigzag stitch is somewhat difficult, but is a key part of getting the ribbon to lay flat. If the zigzag is too narrow or you are not sewing straight, then the ribbon will end up looking slightly scalloped in shape rather than straight. The second stripe from the bottom shows this somewhat 'rippled' effect.

I was a bit miffed about this rippled effect initially but then remembered Mistress Constanzia's sewing mantra --

If it can't be seen 10 feet away or by candlelight, it isn't worth worrying about!

I really like that rule. :)

After sewing on all of the stripes, I put the shirt back together and finished the edges of the sleeves and neckline with black binding. I am pretty happy with the final result (pictured at right -- kindly ignore my headdress and red face. It was hot and my headdress was slipping off the back of my head -- Note to self, must make better headgear!).

So, what did I learn in doing this?
  1. I need more work sewing a straight line! I have therefore decided that every chemise I make for myself, for the foreseeable future, will be a striped chemise. Putting the stripes on is an EXCELLENT exercise in sewing straight. Besides that, until I can work out the exact setting so that the zigzag doesn't cause a ripple, I vow to keep practicing.

  2. Stripes are not overly hard to put on (if you don't worry about the ripples) but do alot for adding some non-shiny 'bling' to a Spanish oriented SCA outfit.

Next personal sewing project: a lightweight, Tudor style "payre'o bodies' (corset) out of linen and a farthingale (Spanish style hoop skirt).

Tuesday, April 7, 2009

Striped Chemise - Part 2

Disclaimer
While I do not claim to be ANY sort of expert when it comes to sewing or creating period garb, due to the complete lack of directions and detailed information regarding the creation of Spanish garb, I want to chronicle what I do. Suggestions, tips or tricks that you have are more than welcome -- feel free to leave a comment.

Today's adventure....
Despite wanting to be further along on this project by now, work things have conspired against me. That said, the original chemise has been taken apart and I have marked the sleeves for applying the black ribbon.

First, I folded the sleeve in half (lengthwise) and ironed it. Then I folded the already halved sleeve in half again and ironed the fold to a crisp edge. I continued this 'halving' of the sleeve until I had made 4 folds. Upon opening the sleeve I had 13 ironed 'lines' (see picture on right). Since Anderson (1979) notes that the most stripes seen on a sleeve was 11, I decided to turn every other ironed line into a 'stripe' line. (see picture to right, click to enlarge)


Once the ironing was done, I turned the sleeve wrong-side up. Using a blue wash-out pen (available at most fabric stores) I placed small dots every 1/2 inch along the length of every other ironed line. This put the resulting dotted lines approximately 3-4 inches apart. (see picture on right, click to enlarge)


By marking the dots on what is effectively the 'inside' of the shirt sleeve, when I turn it over to the 'right' side to apply the ribbons, I will be able to cover the dots on the outside. The beauty of this is if the dots (by some misfortune) do not wash out, they will be covered by ribbon and not show on the outside of the shirt.

Random notes
In taking apart the original chemise I noticed several stains on the sleeves. Originally I was a bit bummed about that and considered scrapping the project until I could afford some new cotton, but then I had an epiphany. In period, a stain would not immediately result in scrapping the material. So I've decided to put the striped chemise back together, applying stripes over the stains if they happen to be over one of the marked dots. While the ribbons won't cover all of the staining (there is one rather large-ish one) it will mimimize them somewhat. Also, I'm going to replace the sleeves on the chemise so that the worst stain is on the back of the arm -- a little creative license. :)


Monday, April 6, 2009

Striped Chemise - Part 1

When I got started in the SCA with St. Florian, I was lucky enough to have someone give me a simple chemise. For years this chemise has been my constant companion at events. That said, after recently doing further research regarding chemise construction in period (15th-16th C.), I have become somewhat disenchanted with my current chemise as it is not accurate.

Problems:


  1. Gathered neckline with a drawstring closure/adjustment.

  2. Gathering casing was sewn on the outside of the neckline rather than the inside.


  3. No undersleeve or neckline gores for ease of movement.
The Plan:

I plan to convert this chemise (upper picture) into a snazzy striped chemise (see the detail picture at left from "Banquet of Herod" by Benabarre).
Striped chemises are documentable in Spain from 1470 - 1507. That said, most of the paintings depicting striped chemises in a Spanish context are seen between 1470 and 1480. Anderson (1979, p. 187) notes that the number the body, back and sleeves may all have stripes, with sleeves having between 4 and 11 depending upon the width of the stripe or 'tira' (if it is an embroidered panel). Furthermore, the colors used vary, with red, gold and black appearing most often. Anderson does document one example that has embroidered tiras in a wine-red color on the sleeves, in addition to plain rows of blue-green and additional plain stripes in wine-red on the shoulders and body (p. 187).

I find it interesting that the period in which striped chemises were seen corresponds to the time period during which stripes (vergardes or verguardes) gained popularity as trim on dresses. Additionally, many of the pictures of fabric striped chemises, as opposed to blackworked tiras/stripes, appear mostly on 'attendants' (see detail picture to the right-above from "Lady and Hare" by Borgona). You can just make out the blackworked panel/stripe through the opening in her outer sleeve, as well as along the cuff. This picture actually illustrates the double-sided nature of blackwork (it looks the same on the 'right' side, as it does on the 'wrong' side.

Also of note is the fact that the dress from the "Banquet of Herod" (above left) depicts a dress in which the farthingale is incorporated into the actual skirt, rather than being an underdress. From the early 1500's onward, farthingales were relegated to the domain of 'underpinnings'. Last weekend I scored some lovely navy blue brocade with gold contrast material. Eventually I plan to make the dress seen in the Benabarre painting - complete with striped chemise, outside lacing sleeves and visible farthingale.

In the meantime, I'm working on the chemise.


  1. Take the existing chemise entirely apart.

  2. Add snazzy black stripes to the sleeves with black satin ribbon.

  3. Pleat the neckline properly and add black binding.

  4. Add black binding to the wrists.

A bit of background on my SCA persona and my SCA interests

I've been involved in the SCA off and on for close to 20 years now (omg...has it REALLY been that long?). Originally, my interest was purely for socializing and playing 'dress-ups'. I shudder to think of my first garb, which I was so very proud of and now makes me CRINGE just thinking about it.

Made by hand in my dorm room, I used a McCalls pattern called 'Maid Marion'. The material was dark green poly-cotton, which had not been washed prior to sewing. While that is bad, the outfit itself is worse -- a straight skirt with elastic waistband and the equivalent of a green pirate shirt with a flounce around the neckline, which could be worn on or off the shoulder. In this get-up I trotted off to my first event feeling very stylish. Once I got there however, I saw that others wore clothing that did NOT look like a cheap Halloween costume, so I ended up spending the rest of the day hiding in my friends cloak to 'hide my shame'.

Since then, my love of doing research (I have a PhD...call me a glutton for punishment) has extended to my SCA hobby. In Australia, my husband and I had the particular good fortune to fall into the Barony of St. Florian-de-la-Riviere, where we were encouraged to do research before creating our garb or developing a persona (long story - check out http://www.sca.org/ for more information). Under the careful tuteledge of Mistress Constanzia Moralez y Zamora, Raphael (my husband Ken) and I made some of our first researched and correctly made (and fitted!) garb. Finally we didn't have costumes, we had CLOTHING....who knew there was such a distinction?!


A bit about my persona

Initially I planned to have a celtic persona, but my love of research and accuracy won out. Sadly, there is very little concrete evidence regarding the clothing and lifestyle of the Irish or Scotts during my preferred time period (1480-1540). Given that Constanzia was so knowlegable about Spanish clothing and lifestyle, I opted to develop a Spanish persona.

My current SCA name is Esperanza Sanchez de Calatrava. I don't have a fully fledged 'persona' story like some SCAdians do. I don't claim to be a 'noble', in fact most of my current garb is more 'workaday' wear -- simple costumes made of cotton drill and muslin (at the time I couldn't afford linen which would have been more period). For instance, the dress to the right is a light sage green drill, with a lined bodice (canvas and drill), a simple cotton chemise and tie on sleeves.

This has been my 'fancy' dress for several years now, as the neckline has some black gimp accented with pearl beads and the sleeves are lined in black linen with fancy pearl and goldtone button closures. As a basic dress it works, but there are accuracy issues that I want to correct. First, the bodice needs more appropriate boning. No, I'm not talking about using 'whalebone'. Rather I need to add more boning to avoid the unsightly 'wrinkle' just under the bust. The second change I intend to make, is to add more appropriate sleeves. Spanish sleeves never opened where I have the openings. I also plan to make a farthingale (a 16th century 'hoop skirt') to give my outfit the right structure.

Since the time the picture above was taken, I have raised the waistline of the dress about 2 inches, as it was cutting me in half when I sat down. Having tried the dress out with the raised waistline, I'm not particularly impressed with the way it looks. I think the best bet is to keep the 'regular' waistline of the dresses, but create a long line, Elizabethan style corset, using somewhat flexible boning. As seen in some drawings/paintings of the time period, some of the dresses had a distinctly rounded, yet supported bodice (right: close up detail of a female listener from 'St. Felix Preaching', by Joan de Burgunya, 1520).

With this dress I plan to raise the hem approximately 4-6 inches and add a black (velveteen or linen) guard (vergarde) around the hem. With the material taken from the hem I plan to make some small cap, 'strip sleeves' with contrasting black trim like the sleeve shown in the picture to the right (picture a close-up of one of Mistress Constanzia's latest fashions).
Since I will be raising the skirt hem significantly, particularly as the farthingale will hold the skirt out further, I will clearly need to add something beneath it -- to show legs (even covered ankles and calves) would have been scandalous during the time period! To that end, I plan to make a new, colored underskirt/petticoat. I'm thinking of gold, with black pomegranate (apparently a symbol of Spain during the time period) or cinqefoils (a type of heraldic flower with 5 petals) appliqued around the hem.

While this is a great plan, it is a project for another day -- first things first, I need to FINALLY make myself the proper 'underpinnings' -- a farthingale and some form of corsetry.