Well, with a new year, comes new resolutions. Last year my primary resolution was to have a completely period, Spanish outfit from the skin out. Hmm...maybe that was a bit too much to 'chew on' in one year.
That said, I did accomplish alot last year on that task.
1. Rope corset...completed except for the shoulder straps.
2. Matching farthingale....almost done (have to accost Deanna at Home Depot to get more lumber strapping to finish the last 3 bands).
3. Remade plain chemise into a bias bound, striped chemise (looks very nifty even if I do say so myself!!)
4. Made a late period wool coat-dress.
5. Remade my purple dress into a split skirt dress. I still have to add the contrast binding around the edges.
6. Started making split pane, cap sleeves for my purple dress. (Have the parts cut and sewn, just need to put them on the actual dress now).
7. Made velvet veil. LOOOOVE IT!! It looks SO much better on me than the plain white head roll I have been wearing for the last 8 years! Now to score more velvet so I can make MANY more of them. :)
Projects that I want to finish for my 'complete Spanish' outfit...
1. Red underskirt with black guards. (Have the material...just need to make it)
2. Make brocade 'farthingale dress' - have the material...just am afraid to cut it (what can I say, I'm not a completely confident seamstress and this pattern is new to me).
3. Finish my knitted silk, 16th C. stockings and garters.
4. Make a pair of chopines -- kind of like a pair of 16th C. platform shoes (before the Crossroads event since last year they would've been VERY handy due to all of the rain!!)
5. Make a silk or organza sash for my dresses.
6. Make a pair of 'bloomers' from the Venetian courtesan pattern (unless I can find some better info about Spanish undies)
Ugh...where to begin. Probably on the UFOs from last year.
By Feb. 20th (Golden Lily and Cillian's fencing prize):
1. Get farthingale done
2. Finish corset
3. Make red underskirt
By Crossroads (in March):
1. Just one thing...CHOPINES!
2. Okay...if I have time I'd like to have the split-cap sleeves on the purple dress and a set of tie on sleeves for my green dress.
By the end of 2010 I would also like to make a black and red linen dress so that I can FINALLY have a new 'day event' dress. I've been wearing the same purple and olive dresses since 2004!
Heres to a new year and new crafts! :)
Sunday, January 17, 2010
Thursday, November 12, 2009
Elizabethan Loose Gown: The sewing (part 2)
Having the pieces cut out, I finally began the 'fun' bit and started the sewing. The body of the gown went together pretty quickly since the lining and outer shell each only had 3 seams. When trying them on together (before being sewn together) I was really pleased with the 'weight' of them. And the flannel is lovely and soft!
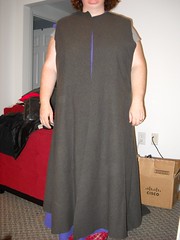
The hem is hanging all wonky in the picture, but this is roughly how the dress would look if I did it the period style and didn't put sleeves on it. That said...I want SLEEVES!!! And, it was my desire for sleeves that presented my first problem -- how to put them in the dress. Option 1: Sew the outer sleeves to the outer shell, and the inner to the inner, then invert the lot and hand sew the cuffs of the sleeves. Option 2: Put the outer and inner sleeves together and THEN attach them to the coat.
Option 1 seemed the best option as it would allow for a more 'finished' look. However, I was leaning toward option 2 because I want to eventually take the sleeves apart and make them button from the shoulder to the wrist so I can poke my arms out if I get too hot.
So, I compromised. I put the inner and outer sleeves together and finished the cuffs, before attaching them to the outer shell only. The sleeve caps are quite big, so they had fat pleats along the top which were a pain in the rear to pin and place -- but turned out terrific!
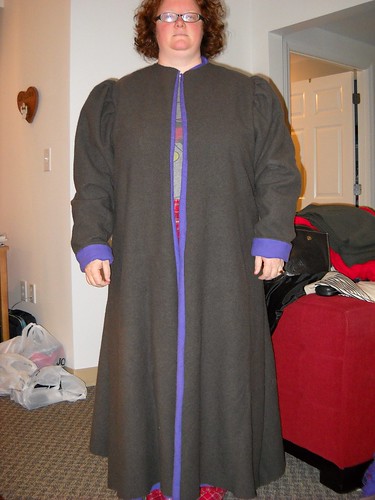
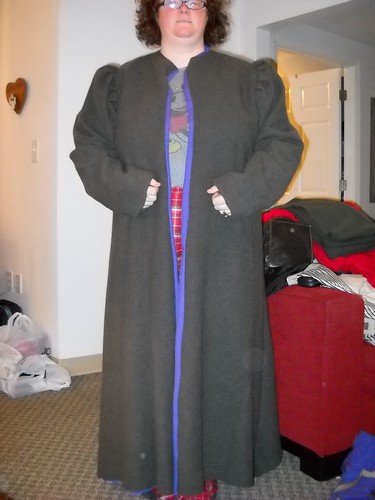
The picture on the left shows how long the sleeves are - sort of. When my arm is hanging down, if I don't hold them up, they hang WAY over my hands. Not necessarily a BAD thing at a cold event, but not convenient either. The picture of the right shows the cuffs rolled up - which is how I think I will wear them as it keeps them on my wrists and provides an added 'wind gap' measure -- that is, less wind can whip up the cuff!.
I have two options here. Option 1: wear the coat with the rolled purple cuffs, and for added flair, sew the front edge as it is shown here, with the hint of purple lining showing. Option 2: Be conservative when I sew my velvet hood and try to have enough velvet left over for both the collar AND faux cuff lining so that I have a black velvet turn back to match the black velvet outer collar (which has yet to be put on).
Hmm...decisions decisions. I'm leaning toward the velvet idea, since my colors are red, black and gold, I'd really like to have my coat be those colors. That said, for the moment I will probably just line the collar in flannel and save the velvet for the hood, because after the event I would like to soak the coat in a black dye bath and see if I can't get it darker (and I don't care if the purple changes color).
Next steps -- adding the collar, hemming it and adding the fasteners down the front! :) Whohoo!! Should have a wearable coat by Friday night!
Elizabethan loose gown (part 1): Sorting out the Pieces
In preparation for the Castle Wars, November 20th tenting event in Macon, it came to my attention that I had NO cold weather gear. Well duh!! Being in Australia from 10 years, I never needed anything warm. Alas, now I do....so after years of drooling over Mistress Constanzia's wool coat, I have decided to make one of my own.
Saturday, October 17, 2009
Spanish split pane cap sleeves ...or more sewing math
 Well, today was the Owl's Nest open house/work day. Ken and I toddled off around 11-ish with a whole car boot FULL of our various odds and sods: sewing machine, knitting, SCA craft box, embroidery, Ken's fencing gear, etc.... the works. With the fire roaring in the back yard grate and several tables set up on the back porch, I set about with a piece of newsprint and my sewing notebook to design a pattern for the Spanish split pane, cap sleeves that I have wanted to add to my dresses for a long time (see the picture to the right, the top half of the sleeve). But pattern drafting is never easy for me.
One word -- MATH.
Numbers and I just do NOT get along. The difficulty is that I can start to visualize how things SHOULD go, but I struggle with getting the figures right.
Friday, October 9, 2009
And that is why....I am not a mathematician!
So, I am working on the farthingale using the Algeca pattern (check my previous post for a picture of the pattern). Now anyone who knows me knows that I went into journalism because I like words - NOT numbers. So, it should come as no surprise that working out the math for the farthingale pattern was a time consuming process. In fact, it took me nearly 4 hours of crunching the numbers before I was pretty sure I got it right.
Guess again, Einstein!
I used the Algeca pattern shapes and worked out how wide the bottom of each cut piece needed to be so that the finished hem would be somewhere in the order of 110 inches. Seemed simple enough - WRONG!
Guess again, Einstein!
I used the Algeca pattern shapes and worked out how wide the bottom of each cut piece needed to be so that the finished hem would be somewhere in the order of 110 inches. Seemed simple enough - WRONG!
Subscribe to:
Posts (Atom)
