Okay...in cruising crafty blogs I kept coming across these really nifty 'project progress' meters and ohhhhh....I wanted one! So after much searching, I have finally found them and installed them.
If you like them and want them too, search no further! I will share the link. Click here.
Oh yeah, as for an update, I am about 6 inches shy of finishing the first knitted silk stocking. (YAY!!) I'm hoping to have it finished by next weekend. Then on to getting things ready for the Golden Lily on February 20th.
Sunday, January 24, 2010
Sunday, January 17, 2010
Contemplating on my 'tasks' for the year
Okay...so my previous post is basically garb related. So, I have been considering things in a wider "what do I want to accomplish SCA-wise in 2010" way.
In 2009, aside from working on updating my garb and making it more presentable, I have done a couple of other things.
- I tried some new things: making woven buttons and knitting stockings
- I actually taught a class again (An overview of women's fashion throughout Europe from 1480-1530)
I really enjoyed teaching the class and wish I knew more things that others might like to learn. That said, I am in the process of turning my notes from that class into an article 'Spanish Dress for Newcomers' -- basically talking about how a few simple things can turn a 'generic' 16th C. sort of look into something distinctly Spanish (gotta spread the 'Spanish love' ; ) ). Unfortunately, other than my research on dresses, I don't have anything else I could teach...so I think teaching will be off my list for 2010.
So, my SCA goals for this year:
2. Try 4 new crafts - 1st will be weaving (Ken got me a Beka lap loom for Christmas), don't know yet what the others will be, quite possibly dabbling in period dyes.
2. If I can get my BP under control again, I'd really like to give field heraldry a try -- I'm just not sure if my anxiety level and BP can handle it. Hmmm...
1. I want to make a heraldic motif underskirt (black with gold calatrava crosses either painted on or appliqued on -- probably painted since my applique skills are not that great).
2. Make heraldic cushions for our camp chairs (appliqued)
3. Get some wooden boxes for carting event stuff in and make them all spiffy with heraldry.
4. Make a painted rectangular banner for myself.
5. Heraldic feast gear (paint arms on plates and bowls, make pouches for our goblets and flatware, make napkins & place settings)
46. Last but not least -- REGISTER MY NEW NAME AND DEVICE!!!! *sigh* I've been soooooo slack about that!!
1. Finish writing up my "Quick & Easy Spanish Clothing" documentation and submit to local SCAmnewsletter, or kingdom A&S booklet....if all else fails, put it online.
2. Get my European Woman's Dress .ppt and handout up online so others can view them.
Hmm...that should keep me out of trouble. :)
In 2009, aside from working on updating my garb and making it more presentable, I have done a couple of other things.
- I tried some new things: making woven buttons and knitting stockings
- I actually taught a class again (An overview of women's fashion throughout Europe from 1480-1530)
I really enjoyed teaching the class and wish I knew more things that others might like to learn. That said, I am in the process of turning my notes from that class into an article 'Spanish Dress for Newcomers' -- basically talking about how a few simple things can turn a 'generic' 16th C. sort of look into something distinctly Spanish (gotta spread the 'Spanish love' ; ) ). Unfortunately, other than my research on dresses, I don't have anything else I could teach...so I think teaching will be off my list for 2010.
So, my SCA goals for this year:
Self:
1. Complete my 'self-challenge' from last year and finish making my complete Spanish outfit from the skin out.2. Try 4 new crafts - 1st will be weaving (Ken got me a Beka lap loom for Christmas), don't know yet what the others will be, quite possibly dabbling in period dyes.
Service:
1.Do a bit more 'service' oriented stuff at events. I find I get bored easily at events, so to that end I'm going to volunteer a bit more. For instance, I have volunteered as 'List Wench' for an upcoming rapier tourney (well, in March that is). We'll see how that goes. I just pray I don't completely screw it up! :)2. If I can get my BP under control again, I'd really like to give field heraldry a try -- I'm just not sure if my anxiety level and BP can handle it. Hmmm...
Heraldry:
Create at least 5 heraldic items1. I want to make a heraldic motif underskirt (black with gold calatrava crosses either painted on or appliqued on -- probably painted since my applique skills are not that great).
2. Make heraldic cushions for our camp chairs (appliqued)
3. Get some wooden boxes for carting event stuff in and make them all spiffy with heraldry.
4. Make a painted rectangular banner for myself.
5. Heraldic feast gear (paint arms on plates and bowls, make pouches for our goblets and flatware, make napkins & place settings)
46. Last but not least -- REGISTER MY NEW NAME AND DEVICE!!!! *sigh* I've been soooooo slack about that!!
Teaching:
Being that I don't really know anything that others would be interested in learning (although if my chopines work out well, that might make a cool class), so my 'teaching' goals are more 'research/writing' oriented.1. Finish writing up my "Quick & Easy Spanish Clothing" documentation and submit to local SCAmnewsletter, or kingdom A&S booklet....if all else fails, put it online.
2. Get my European Woman's Dress .ppt and handout up online so others can view them.
Hmm...that should keep me out of trouble. :)
New Year's Crafty Resolutions....
Well, with a new year, comes new resolutions. Last year my primary resolution was to have a completely period, Spanish outfit from the skin out. Hmm...maybe that was a bit too much to 'chew on' in one year.
That said, I did accomplish alot last year on that task.
1. Rope corset...completed except for the shoulder straps.
2. Matching farthingale....almost done (have to accost Deanna at Home Depot to get more lumber strapping to finish the last 3 bands).
3. Remade plain chemise into a bias bound, striped chemise (looks very nifty even if I do say so myself!!)
4. Made a late period wool coat-dress.
5. Remade my purple dress into a split skirt dress. I still have to add the contrast binding around the edges.
6. Started making split pane, cap sleeves for my purple dress. (Have the parts cut and sewn, just need to put them on the actual dress now).
7. Made velvet veil. LOOOOVE IT!! It looks SO much better on me than the plain white head roll I have been wearing for the last 8 years! Now to score more velvet so I can make MANY more of them. :)
Projects that I want to finish for my 'complete Spanish' outfit...
1. Red underskirt with black guards. (Have the material...just need to make it)
2. Make brocade 'farthingale dress' - have the material...just am afraid to cut it (what can I say, I'm not a completely confident seamstress and this pattern is new to me).
3. Finish my knitted silk, 16th C. stockings and garters.
4. Make a pair of chopines -- kind of like a pair of 16th C. platform shoes (before the Crossroads event since last year they would've been VERY handy due to all of the rain!!)
5. Make a silk or organza sash for my dresses.
6. Make a pair of 'bloomers' from the Venetian courtesan pattern (unless I can find some better info about Spanish undies)
Ugh...where to begin. Probably on the UFOs from last year.
By Feb. 20th (Golden Lily and Cillian's fencing prize):
1. Get farthingale done
2. Finish corset
3. Make red underskirt
By Crossroads (in March):
1. Just one thing...CHOPINES!
2. Okay...if I have time I'd like to have the split-cap sleeves on the purple dress and a set of tie on sleeves for my green dress.
By the end of 2010 I would also like to make a black and red linen dress so that I can FINALLY have a new 'day event' dress. I've been wearing the same purple and olive dresses since 2004!
Heres to a new year and new crafts! :)
That said, I did accomplish alot last year on that task.
1. Rope corset...completed except for the shoulder straps.
2. Matching farthingale....almost done (have to accost Deanna at Home Depot to get more lumber strapping to finish the last 3 bands).
3. Remade plain chemise into a bias bound, striped chemise (looks very nifty even if I do say so myself!!)
4. Made a late period wool coat-dress.
5. Remade my purple dress into a split skirt dress. I still have to add the contrast binding around the edges.
6. Started making split pane, cap sleeves for my purple dress. (Have the parts cut and sewn, just need to put them on the actual dress now).
7. Made velvet veil. LOOOOVE IT!! It looks SO much better on me than the plain white head roll I have been wearing for the last 8 years! Now to score more velvet so I can make MANY more of them. :)
Projects that I want to finish for my 'complete Spanish' outfit...
1. Red underskirt with black guards. (Have the material...just need to make it)
2. Make brocade 'farthingale dress' - have the material...just am afraid to cut it (what can I say, I'm not a completely confident seamstress and this pattern is new to me).
3. Finish my knitted silk, 16th C. stockings and garters.
4. Make a pair of chopines -- kind of like a pair of 16th C. platform shoes (before the Crossroads event since last year they would've been VERY handy due to all of the rain!!)
5. Make a silk or organza sash for my dresses.
6. Make a pair of 'bloomers' from the Venetian courtesan pattern (unless I can find some better info about Spanish undies)
Ugh...where to begin. Probably on the UFOs from last year.
By Feb. 20th (Golden Lily and Cillian's fencing prize):
1. Get farthingale done
2. Finish corset
3. Make red underskirt
By Crossroads (in March):
1. Just one thing...CHOPINES!
2. Okay...if I have time I'd like to have the split-cap sleeves on the purple dress and a set of tie on sleeves for my green dress.
By the end of 2010 I would also like to make a black and red linen dress so that I can FINALLY have a new 'day event' dress. I've been wearing the same purple and olive dresses since 2004!
Heres to a new year and new crafts! :)
Thursday, November 12, 2009
Elizabethan Loose Gown: The sewing (part 2)
Having the pieces cut out, I finally began the 'fun' bit and started the sewing. The body of the gown went together pretty quickly since the lining and outer shell each only had 3 seams. When trying them on together (before being sewn together) I was really pleased with the 'weight' of them. And the flannel is lovely and soft!
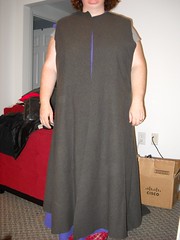
The hem is hanging all wonky in the picture, but this is roughly how the dress would look if I did it the period style and didn't put sleeves on it. That said...I want SLEEVES!!! And, it was my desire for sleeves that presented my first problem -- how to put them in the dress. Option 1: Sew the outer sleeves to the outer shell, and the inner to the inner, then invert the lot and hand sew the cuffs of the sleeves. Option 2: Put the outer and inner sleeves together and THEN attach them to the coat.
Option 1 seemed the best option as it would allow for a more 'finished' look. However, I was leaning toward option 2 because I want to eventually take the sleeves apart and make them button from the shoulder to the wrist so I can poke my arms out if I get too hot.
So, I compromised. I put the inner and outer sleeves together and finished the cuffs, before attaching them to the outer shell only. The sleeve caps are quite big, so they had fat pleats along the top which were a pain in the rear to pin and place -- but turned out terrific!
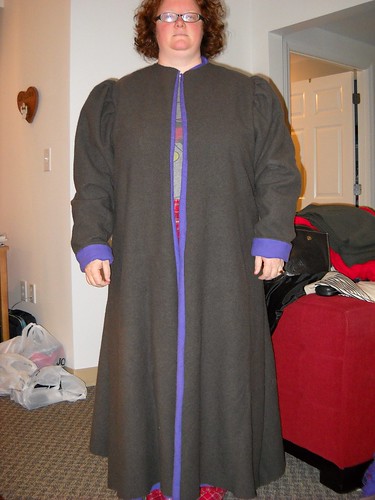
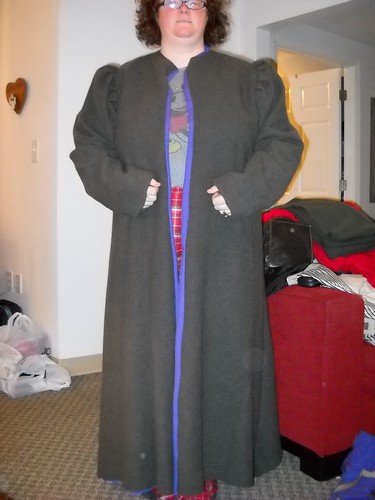
The picture on the left shows how long the sleeves are - sort of. When my arm is hanging down, if I don't hold them up, they hang WAY over my hands. Not necessarily a BAD thing at a cold event, but not convenient either. The picture of the right shows the cuffs rolled up - which is how I think I will wear them as it keeps them on my wrists and provides an added 'wind gap' measure -- that is, less wind can whip up the cuff!.
I have two options here. Option 1: wear the coat with the rolled purple cuffs, and for added flair, sew the front edge as it is shown here, with the hint of purple lining showing. Option 2: Be conservative when I sew my velvet hood and try to have enough velvet left over for both the collar AND faux cuff lining so that I have a black velvet turn back to match the black velvet outer collar (which has yet to be put on).
Hmm...decisions decisions. I'm leaning toward the velvet idea, since my colors are red, black and gold, I'd really like to have my coat be those colors. That said, for the moment I will probably just line the collar in flannel and save the velvet for the hood, because after the event I would like to soak the coat in a black dye bath and see if I can't get it darker (and I don't care if the purple changes color).
Next steps -- adding the collar, hemming it and adding the fasteners down the front! :) Whohoo!! Should have a wearable coat by Friday night!
Elizabethan loose gown (part 1): Sorting out the Pieces
In preparation for the Castle Wars, November 20th tenting event in Macon, it came to my attention that I had NO cold weather gear. Well duh!! Being in Australia from 10 years, I never needed anything warm. Alas, now I do....so after years of drooling over Mistress Constanzia's wool coat, I have decided to make one of my own.
Saturday, October 17, 2009
Spanish split pane cap sleeves ...or more sewing math
 Well, today was the Owl's Nest open house/work day. Ken and I toddled off around 11-ish with a whole car boot FULL of our various odds and sods: sewing machine, knitting, SCA craft box, embroidery, Ken's fencing gear, etc.... the works. With the fire roaring in the back yard grate and several tables set up on the back porch, I set about with a piece of newsprint and my sewing notebook to design a pattern for the Spanish split pane, cap sleeves that I have wanted to add to my dresses for a long time (see the picture to the right, the top half of the sleeve). But pattern drafting is never easy for me.
One word -- MATH.
Numbers and I just do NOT get along. The difficulty is that I can start to visualize how things SHOULD go, but I struggle with getting the figures right.
Friday, October 9, 2009
And that is why....I am not a mathematician!
So, I am working on the farthingale using the Algeca pattern (check my previous post for a picture of the pattern). Now anyone who knows me knows that I went into journalism because I like words - NOT numbers. So, it should come as no surprise that working out the math for the farthingale pattern was a time consuming process. In fact, it took me nearly 4 hours of crunching the numbers before I was pretty sure I got it right.
Guess again, Einstein!
I used the Algeca pattern shapes and worked out how wide the bottom of each cut piece needed to be so that the finished hem would be somewhere in the order of 110 inches. Seemed simple enough - WRONG!
Guess again, Einstein!
I used the Algeca pattern shapes and worked out how wide the bottom of each cut piece needed to be so that the finished hem would be somewhere in the order of 110 inches. Seemed simple enough - WRONG!
Wednesday, October 7, 2009
Spanish Farthingale....part one
My SCA goal for the year was to create a completely period outfit from the skin out. Since I pfaffed the summer away, I won't meet the goal, but I am still making progress toward it. I finished the first part in the spring when I converted a plain, gathered neck chemise into a striped, round neck chemise. This past week I have finished the corset (minus the shoulder straps) and now on to part 3 - the farthingale.
Monday, October 5, 2009
SUCCESS! The Corded Corset is DONE!
Well, thanks to a relaxing day off work I was able to finish my corset. I'm really pleased with how it turned out since it is my first attempt. I even added lacing holes to the sides so that I will be able to tie the farthingale onto the corset. Sometime in the next week I'll get around to adding tie-on shoulder straps to it.
As you can see from the back pictures (click 'read more' to see the pics), it laces completely shut - which wasn't expected. I'm thinking that I will eventually cut it up the front so that it laces from both the front and back. That would be useful as I'll be able to lace myself into the corset rather than needing Ken to do it each time I get dressed.
Next up on the agenda - Spanish hood/veil out of velvet and silk satin and marking out the embroidery for the muff.
As you can see from the back pictures (click 'read more' to see the pics), it laces completely shut - which wasn't expected. I'm thinking that I will eventually cut it up the front so that it laces from both the front and back. That would be useful as I'll be able to lace myself into the corset rather than needing Ken to do it each time I get dressed.
Next up on the agenda - Spanish hood/veil out of velvet and silk satin and marking out the embroidery for the muff.
Sunday, October 4, 2009
Yet more projects and plans...deadline Nov. 20 :)
I had a perfectly lovely day running errands with Ken yesterday. We ran all over hill and dale (namely Atlanta and the regions around it). Our goals were to hit the army/navy surplus stores hoping to get lucky and score some cheap camping equipment for the November SCA event we want to go to. While we didn't score cheap camping equipment, we DID pick up some nifty things for some sewing projects for that event.
Friday, October 2, 2009
Corset update....
Well, the corset is coming along. When trimming the plastic cable ties, the tin nips and gently melting the cut ends worked very well. After trimming all of the ties and the jute cord, the corset was pronounced by others as 'really neat'.
Now I'm on the odious task of putting lacing holes in the back. Since I am trying to maintain SOME form of authenticity, no metal grommets are being used, which means simply, that I am doing all of the lacing holes by hand. Yup, I use an awl, split the fibers apart and then with doubled red thread I hand stitch around each hole. It takes about 10-15 minutes per hole and I have 22 holes total to finish.
I don't really mind doing this. I actually like doing this type of hand sewing. The worst part is that I tend to kink my neck in an odd fashion while doing these things, and because of the tension I have to keep on the thread, after awhile it cuts my hands. So, if all goes well, I should have the lacing holes finished and the binding on the corset by the end of the weekend. Heres hoping anyway.... (pictures soon).
Monday, September 28, 2009
The latest FrankenKirtle (tm) drama....
Okay, so I decided to use 'some' cable ties (around 10) spread out over the body of the corset for support. This seemed like a great idea UNTIL, I remembered that I have to trim the buggers and get them pushed about an inch deep into the channel so the ends are lower than the binding. Unfortunately, this task is not easy. When I cut the ends off the cable ties I get very sharp corners. I tried filing them with wood files - no good. The new solution (which has yet to be tried out - maybe at Fighter Practice/A&S tomorrow night) is to cut the ties with a pair of metal nippers, then use a lighter to melt the ends a bit, then use some small needle nose pliers to shove the ties deep into the boning channels.
What is the bet that I end up with melted plastic on my skin at some point??
Sunday, September 27, 2009
Conundrum of a burgeoning 'authenticy maven' - to cable tie or NOT to cable tie...
So, here's the deal.
Given my *ahem* Mae West-ish upper body, when making my current project (a corded corset) I decided to use some heavy duty cable ties periodically for added support -- because cord on its own would just not be stiff enough to hold things up or tight against the body.
However, since I really wanted to create as authentic an outfit as possible, the burgeoning authenticity maven in me is having problems with the use of the plastic cable ties. On the one hand, aside from the fact that I have now announced the use of cable ties to the world (okay, my 5 or so readers) no one would ever know about it. I mean, it isn't like anyone but Ken is going to get close enough to my corseted body to see that the cable ties are there.
On the other hand, I feel a bit 'wrong' about using the ties.
Hence the question...what to do...what to do?
Given my *ahem* Mae West-ish upper body, when making my current project (a corded corset) I decided to use some heavy duty cable ties periodically for added support -- because cord on its own would just not be stiff enough to hold things up or tight against the body.
However, since I really wanted to create as authentic an outfit as possible, the burgeoning authenticity maven in me is having problems with the use of the plastic cable ties. On the one hand, aside from the fact that I have now announced the use of cable ties to the world (okay, my 5 or so readers) no one would ever know about it. I mean, it isn't like anyone but Ken is going to get close enough to my corseted body to see that the cable ties are there.
On the other hand, I feel a bit 'wrong' about using the ties.
Hence the question...what to do...what to do?
Wednesday, September 23, 2009
FrankenKirtle fights back....
I am right-handed and at the moment my right hand is blisters, sore and trembling...due to FrankenKirtle fighting back!
I have spent the last hour wrestling boning materials into the corset section and my hand is SORE! The cord boning is an easy thing. I cut off a section of jute that is 4x the length of the channel, double it twice and thread it through the channel using a bit of floral wire. The jute goes through the channels like a hot knife through butter. However the cable ties are a another matter entirely.
I have spent the last hour wrestling boning materials into the corset section and my hand is SORE! The cord boning is an easy thing. I cut off a section of jute that is 4x the length of the channel, double it twice and thread it through the channel using a bit of floral wire. The jute goes through the channels like a hot knife through butter. However the cable ties are a another matter entirely.
Tuesday, September 22, 2009
IT LIVES!!!! FrankenKirtle (tm) rises from the dust...
Well, I stayed home sick today, so between bouts of marking student assignments, I have been working on the FrankenKirtle (tm) -- mark 10 papers, work for a couple of hours, and so on.
What I've done...
On Sunday I used the Drea Leed's 'Corset Pattern Generator' to come up with the basic pattern. Now, I used this generator when I first attempted a corded corset, it ended up being far too small, so this time I over estimated the length by 3 inches and that seemed to help. I think when it is finished that I will have an inch or 2 gap at the back, but I can live with that.
Additionally, this pattern doesn't have straps, which is something I will be adding to it once the boning and binding has been completed.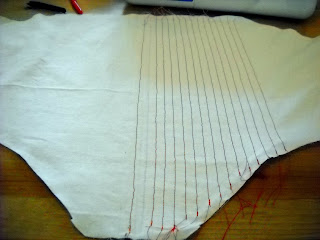
To recap, the inner layer is white linen, middle layer is heavy canvas and the outer layer is white duck/drill. (see picture at right). Once the layers were cut out, I marked the center of the bust and drew a line, then sewed that line first. This line is then what I use the whole rest of the time to position the needle for all other lines.
To test how wide the channels needed to be I arbitrarily made the first channel 1cm wide, then tested it with my jute cord and some heavy-duty cable ties that I picked up as alternate boning if needed. When playing with the jute, 2 twisted strands didn't quite fill the channels, so I've decided to use 4. Also, to provide support near the laces I am going to give in and use two of the cable ties along each lacing edge. I feel this will provide the added suppo rt needed to keep the fabric from buckling when the corset is laced up.
Rather than marking each line, I just moved my needle as far right as it will go, and lined the left edge of the presser foot up with the test line that I sewed first. Every now and then I'd find that I had wavered a little bit, so I would drag out my quilting ruler, and run a new 'straight' line. As a side note, for those who read my experience in creating the striped chemise -- sewing corset channels is also VERY good practice in sewing a straight line! Thanks to all of the practice I am definitely getting better! :)
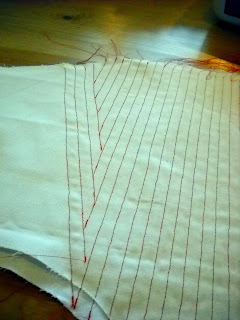
I sewed straight channels until I reached the side of each bust (I tested this by holding it up in front of a mirror). On each side of the bust I have a series of straight and angled channels. Since the angled channels don't have a bottom opening, I will use cable ties in these (see picture at right).
At this stage all of the boning channels are finished, so the next task is inserting the cord into the channels. More pictures will be posted as things progress. Getting to this point has taken me about 5 hours (1 to cut out, and 4 to sew channels). The channels are VERY time consuming and a slow slog. I hope to have the cord in the channels by Thursday and have the whole corset part finished by Saturday so that I can start work on the farthingale.
What I've done...
On Sunday I used the Drea Leed's 'Corset Pattern Generator' to come up with the basic pattern. Now, I used this generator when I first attempted a corded corset, it ended up being far too small, so this time I over estimated the length by 3 inches and that seemed to help. I think when it is finished that I will have an inch or 2 gap at the back, but I can live with that.
Additionally, this pattern doesn't have straps, which is something I will be adding to it once the boning and binding has been completed.

To recap, the inner layer is white linen, middle layer is heavy canvas and the outer layer is white duck/drill. (see picture at right). Once the layers were cut out, I marked the center of the bust and drew a line, then sewed that line first. This line is then what I use the whole rest of the time to position the needle for all other lines.
To test how wide the channels needed to be I arbitrarily made the first channel 1cm wide, then tested it with my jute cord and some heavy-duty cable ties that I picked up as alternate boning if needed. When playing with the jute, 2 twisted strands didn't quite fill the channels, so I've decided to use 4. Also, to provide support near the laces I am going to give in and use two of the cable ties along each lacing edge. I feel this will provide the added suppo
 rt needed to keep the fabric from buckling when the corset is laced up.
Rather than marking each line, I just moved my needle as far right as it will go, and lined the left edge of the presser foot up with the test line that I sewed first. Every now and then I'd find that I had wavered a little bit, so I would drag out my quilting ruler, and run a new 'straight' line. As a side note, for those who read my experience in creating the striped chemise -- sewing corset channels is also VERY good practice in sewing a straight line! Thanks to all of the practice I am definitely getting better! :)

I sewed straight channels until I reached the side of each bust (I tested this by holding it up in front of a mirror). On each side of the bust I have a series of straight and angled channels. Since the angled channels don't have a bottom opening, I will use cable ties in these (see picture at right).
At this stage all of the boning channels are finished, so the next task is inserting the cord into the channels. More pictures will be posted as things progress. Getting to this point has taken me about 5 hours (1 to cut out, and 4 to sew channels). The channels are VERY time consuming and a slow slog. I hope to have the cord in the channels by Thursday and have the whole corset part finished by Saturday so that I can start work on the farthingale.
Sunday, September 20, 2009
The birth of Franken-kirtle....
Well, after being a good girl and marking 20 assignments before starting my sewing, I was finally able to start working on the Franken-kirtle. YAY! I have to say, marking those 20 papers was a loooong 5 hours! And I have 50 more to finish by Thursday morning! *groan*
Anyway, this evening I got the layers cut out -- inner out of linen (softer against the skin), heavy canvas for the middle layer and duck/twill for the outer layer. (I'll post pictures tomorrow.)
Now, before someone argues that a corset wouldn't be worn against the skin, let me explain my logic.
Anyway, this evening I got the layers cut out -- inner out of linen (softer against the skin), heavy canvas for the middle layer and duck/twill for the outer layer. (I'll post pictures tomorrow.)
Now, before someone argues that a corset wouldn't be worn against the skin, let me explain my logic.
Why I will NEVER make SCA garb out of ANY synthetic material....
Okay...I admit it. I started my SCA life with a poly-cotton dress made from a Simplicity 'Maid Marion' pattern that ended up looking like a cheesy 1970's prom dress, complete with an off the shoulder flounce. To cap off this synthetic, out of period nightmare, my first cloak was polyester velvet and I didn't have enough to match the nap, so it ended up looking two-toned.
As I matured in my SCA lifestyle, I remember hearing the oft repeated phrase "NEVER use polyester or synthetic fibers to make garb".
As I matured in my SCA lifestyle, I remember hearing the oft repeated phrase "NEVER use polyester or synthetic fibers to make garb".
Tales from the darkside - that is a trip to JoAnn's Fabric
Okay, the morning started quiet enough.. a quick Cracker Barrel brekkie, followed by a run to the grocery, mark 20-30 student assignments and then an afternoon of sewing. The problem is that Ken and I do some of our best thinking as a couple, while breakfasting at Cracker Barrel (must be something in the pancakes?).
Anyway, over brekkie we were debating/hashing out how best to incorporate elements of Ken's SCA arms into the black linen fencing hood that is his current pet project. He wanted to do some appliqued dove tailing onto the hem of it, I was of the mind that doing so would be far more difficult than he thinks (an opinion I still hold). Then we talked about using fabric paint, but were worried that would make the hem of the hood stiff and make it lay funny. Then I suggested that he use stem stitch and fill stitch to embroider his foxes (one major heraldic charge) onto each of the 4 gores in the base of the hood. At last...an idea worth following. One problem -- we can't find our embroidery hoops.
So, it was off to JoAnn Fabrics.
Anyway, over brekkie we were debating/hashing out how best to incorporate elements of Ken's SCA arms into the black linen fencing hood that is his current pet project. He wanted to do some appliqued dove tailing onto the hem of it, I was of the mind that doing so would be far more difficult than he thinks (an opinion I still hold). Then we talked about using fabric paint, but were worried that would make the hem of the hood stiff and make it lay funny. Then I suggested that he use stem stitch and fill stitch to embroider his foxes (one major heraldic charge) onto each of the 4 gores in the base of the hood. At last...an idea worth following. One problem -- we can't find our embroidery hoops.
So, it was off to JoAnn Fabrics.
Saturday, September 19, 2009
Back from a crafty hiatus with new ideas and inspiration!
Well, my crafty drought seems to have been broken thanks in part of preparing a dress analysis A&S class for our local SCA group. Now I am all inspired again and getting back to sewing.
First up - a corded corset for wearing under garb. The original plan was to make a separate corset and farthingale (medieval hoops skirt, but the more I think about it the more I think I'm going to actually attach the two parts into a kind of 'Franken-kirtle'. *lol* (Kirtle for those who don't know is kind of a medieval underdress that was tight and 'molded' the body).
So tonight begins the making of....
THE FRANKEN-KIRTLE!
(film at eleven....okay...well...pictures at least later :)
First up - a corded corset for wearing under garb. The original plan was to make a separate corset and farthingale (medieval hoops skirt, but the more I think about it the more I think I'm going to actually attach the two parts into a kind of 'Franken-kirtle'. *lol* (Kirtle for those who don't know is kind of a medieval underdress that was tight and 'molded' the body).
So tonight begins the making of....
THE FRANKEN-KIRTLE!
(film at eleven....okay...well...pictures at least later :)
Subscribe to:
Posts (Atom)
